Processing Deliveries on Season Road

From the Dashboard, select the Road icon.
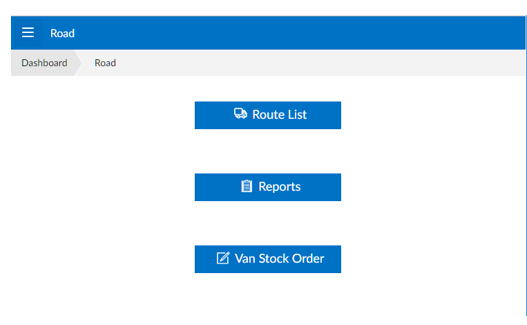
The Road Menu
The Road Menu contains all the common utilities/operations that an operator with the tablet out on the road would use.
The Route List
The Route List shows the list of calls for a selected route and date in the order the calls should be visited.
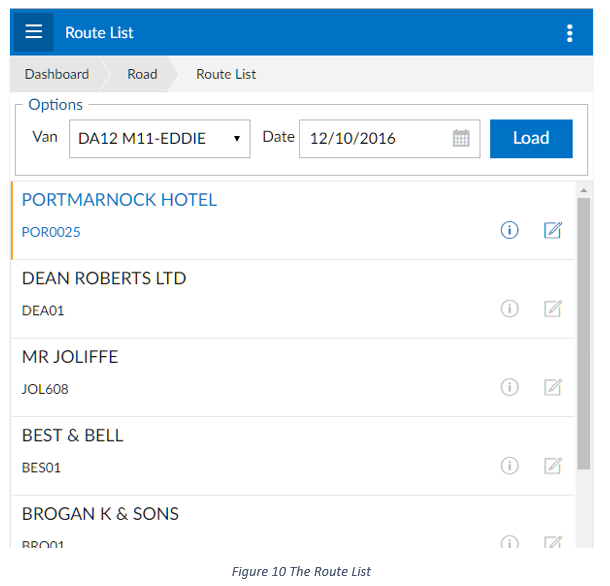
To generate the call list,
- Select the route from the Van drop down.
- Select the date for the desired call list in the Date form.
- Click/tap on the Load button, this should generate the call list.
Once the list has been generated you can manage each call by clicking/tapping the icons on the call list.
The icons on the call list are:

Call management icon – Zooms into the call management screen where you can set the call status and view orders taken against this call.

New Order – This button starts a new order for later delivery. It is used if you are taking an order at the time of call that will be delivered at a later date.

New Invoice – This button starts a new invoice for this call. This is used when you are making up an order and delivering it to the customer at the point of entry. This loads the Order Entry Program with the customer and date defaulted.

View Deliveries – If the system is set up for deliveries, this icon will appear to allow you to view the deliveries for this call. If you do not see this icon, the system has not been set up for deliveries. The deliveries are orders that have been placed in Season office and are being delivered on the tablet.
To begin processing an order,
- Select the order on the list and tap on the View Deliveries icon.
- This will display a list of deliveries for this customer.

3. Tap on the delivery you wish to process, this will open the Order Entry program with the selected order pre-loaded.
Amending an Order
Adding a Product
To add a product, the operator can either click/tap on the Add Product button or use the add button in the Quick Bar.


Either of these will launch the Order Line Zoom.
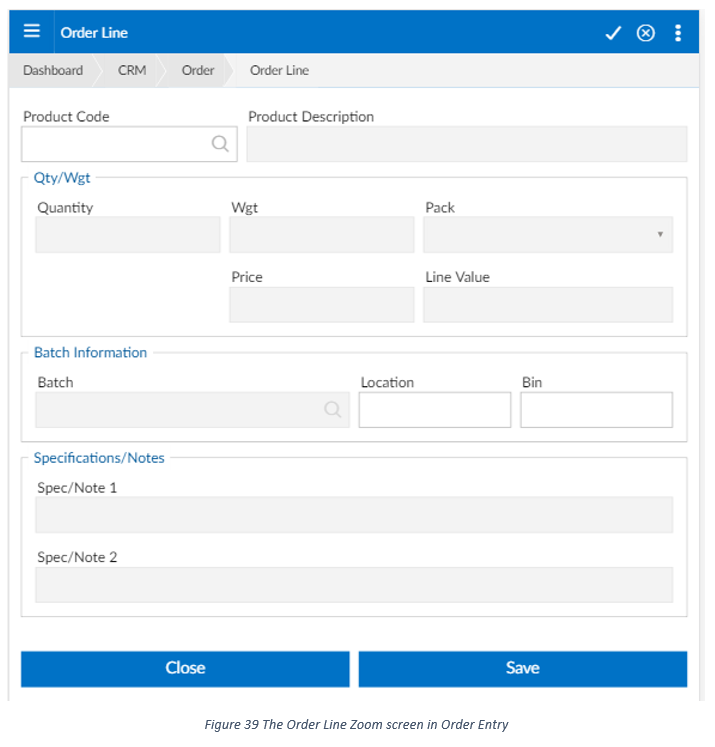
The Order Line Zoom Quick Bar
The Order Line Zoom Quick Bar has the following options:

Save icon – This saves the current line details.

Delete icon – This deletes the current line from the order. This will only appear when editing an existing line.

Close icon – This will close the Order Line Zoom screen.
The Order Line Zoom Quick Bar
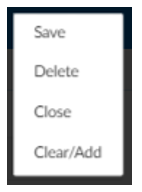
The Order Line Zoom Quick Menu contains the following options:
- Save – saves the current line.
- Delete – deletes the current line, this will only appear when editing an existing line.
- Close – closes the Order Line Zoom Screen.
- Clear / Add – clears any unsaved changes.
Adding a product to the Order using the Order Line Zoom Screen
When the operator wants to add a product to an order, the first thing they will need to do is to select a product. They can do this by:
- Using the Product Selection list by clicking/tapping on the popup icon in the product code field.

2. If the operator knows the product code they can simply enter it.
3. The operator can use the product autocomplete to search for the product.
To use the product autocomplete, simply enter the search term in the Product Code form.
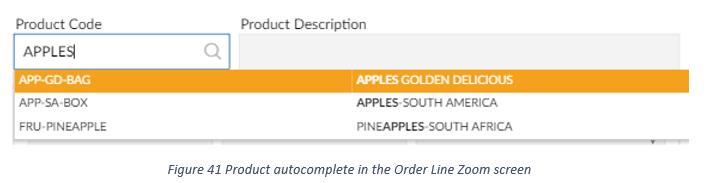
This will bring up a list of the matching products. To select a product, click/tap on it.
After the product has been selected, the operator will be able to enter the quantity/weight as appropriate.
The price will automatically be defaulted, however, the operator can change the price if they have sufficient rights.
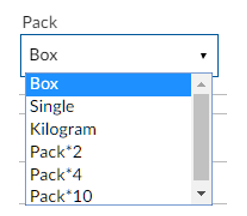
Split Products – If the product is set up as a split product, the operator will be able to select the split pack type in the Pack drop down.
Traced Products – If the operator is making up an invoice and the selected product is a traced product, they will have to select a batch for the product line.
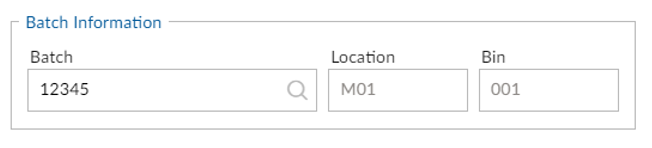
The operator can do this by clicking/tapping on the popup icon in the Batch form, and selecting the appropriate batch from the list.
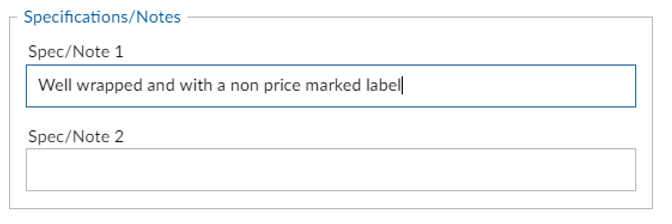
Entering Product Specification/Notes
Should the operator want to enter in specifications or notes for the product line they can do this in the Specifications/Notes section.
Saving the Product Line
When the product line is ready it can be saved using the Save button on the screen,

or the Save icon in the Quick Bar.

After saving the order Line Zoom will clear, ready for another product to be entered.
When all the product lines have been entered, the operator can close the Order Line Zoom by clicking/tapping on the Close button, using the Close Quick Bar icon,

or the close option in the Quick Menu.

Completing an Order
Submitting an Order
After all the order lines have been added/amended to the order it must be submitted.
To submit the order, click/tap on the Submit button, click/tap on the Save icon in the Quick Bar,
or use the Submit Order menu options in the Quick Menu.

To cancel the order, click/tap on the Cancel button or use the Cancel Order option in the Quick Menu.

Capturing a signature
In certain circumstances, it will be required for the operator to get a signature from the customer.
The Signature Capture screen is displayed after the order has been submitted.
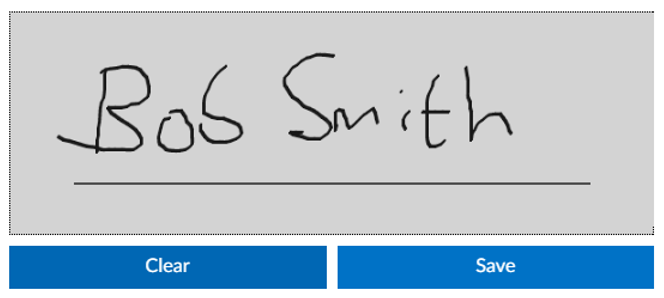
The customer simply needs to sign on the screen. The signature can then be saved with the Save button, or cleared with the Clear button (if the signature needs re-entered).
After the signature has been saved, the Order Complete Menu will be displayed.
The Order Complete Menu
After the order has been submitted ( and a signature captured if necessary), the Complete Order menu will be displayed. This menu contains the operations necessary for finishing off the order.
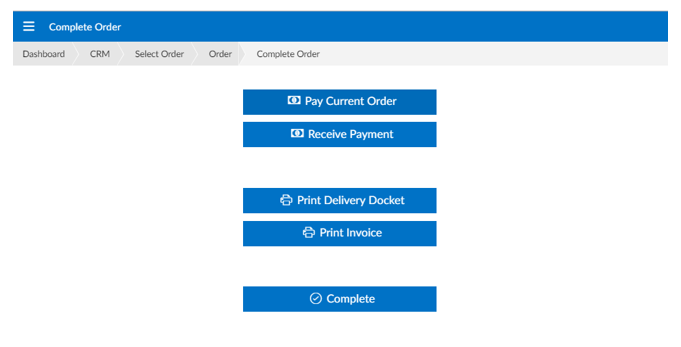
The options on the Complete Order Menu are:
- Pay Current Order – this option allows the operator to take a payment that is allocated to the current order.
- Receive Payment – this option allows the operator to take general payment that is not allocated to the current order.
- Print Delivery Docket – this prints the delivery docket.
- Print Delivery Docket – this prints an invoice, if the order does not already have an invoice number it will be given one.
- Complete – this completes the order process and returns the operator to the screen they were on before starting the order e.g. Route List.