How to set up a Traceability Profile
Traceability Profiles allow the system to record traceability information (batch numbers, use by and pack dates etc…) as a product flows from Goods in, through Production to dispatch at Goods Out.
In order to know what traceability information should be recorded for a product, the system allows Traceability Profiles to be set up against the product groups.
Creating a Traceability Profile
The main Traceability Profile setup program is located under the ‘General Setups’ menu in Product Setup. (An Additional Traceability Profile setup for production templaste is located in the Production Template program)
To load the Traceability Profile setup program,
- From the Operations menu load Product Setup by clicking on Product Management -> Product Setup
- Then, from the Product Setup program, click on ‘General Settings’ -> ‘Traceability’

- This will load the Traceability Profile setup program.
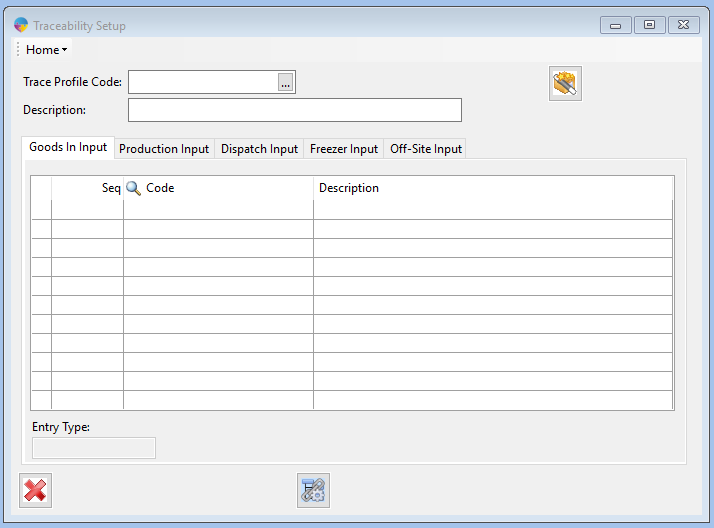
- Clear any loaded data by clicking in the ‘Trace Profile Code’ field and pressing F5
- Enter in the new Traceabilty Profile Code and Description.
- Click on the Save button at the tome of the screen, press F2, or click in to one of the detail grids to save the header.
Now that the header has been saved we can add trace codes to the various input grids. For information on setting up trace codes, click here.
There are various sections for traceability input. These are,
- Goods In Input – anything entered here will be required when booking in purchase orders
- Production Input – anything entered here will be required when producing products through jobs
- Dispatch Input – anything entered here will be required when allocating product to sales order through Good Out
- Freezer Input – Currently for reference only when freezing products.
- Off Site Input – currently for reference only when sending stock to an offsite location
To enter a trace code against a traceability section,
- Click in to the next empty row in the grid
- Enter in a sequence number in to the Seq column. The sequence number determines the order that the trace codes will appear in Factory
- Select the Code from the Trace Code popup by pressing the pop up button or pressing F4

- Tab to across to finish the line and save
- To delete a line, select it on the grid and press F2.
In this way enter in the required trace codes to each section
The ‘Entry Type’ field at the bottom of the windows shows the entry type required for the trace code item.
If the entry type is ‘Date’ there are some additional options.
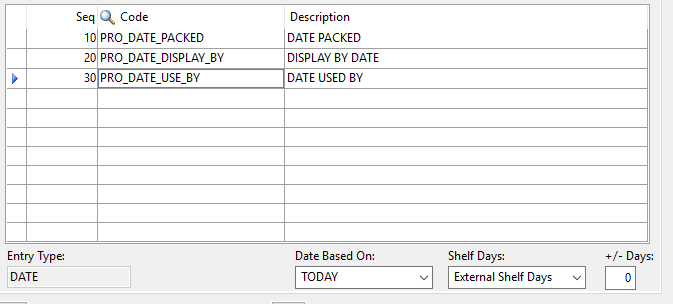
- Date Based On – This allows the date in this section to be based on the date for a previous section or ‘TODAY’. If based on a previous section, the date entered will be copied to this trace item. e.g. a kill date from the goods in section could be copied to a kill date in the production section. If this is blank the date will not be defaulted and will require entry by an operator
- Shelf Days – Setting this will add the appropriate numbers of days on to the initial date. The options here are taken from the internal and external shelf days in Product Setup
- +/- Days – Setting a +/- number of days will add this number of days on to the final date.
Editing an existing Traceability Profile
To edit an existing Traceability Profile,
- Click in to the Trace Profile Code field and press F5 to clear any current data
- Press F4 or use the popup button to load the Traceability Profile.
- Simply make any changes necessary to the requires traceability sections.
Copying an existing Traceability Profile
Instead of setting a traceability profile up from scratch, a Traceability Profile can be created by copying another.
To copy a Traceability Profile,
- Click in to the Trace Profile Code field and press F5 to clear any current data.
- Press F4 or use the popup button to load the Traceability Profile to be copied
- Click on the Wizard icon
 . This will load the Copy Trace Wizard.

- Now, simply enter in the new Trace Profile Code and Description.
- The Options section allows the complete trace profile to be copied or an individual trace section.
- Click on the save icon to create the new Traceability Profile.