Setting up Traceability Codes
From version 15.1 onward, Season allows the user to setup their own set of traceability codes. These can be anything the user wants to have as part of the traceability information.
Loading the Trace Code setup program
To load the Trace Code setup program,
- From the Product Setup Program, select the General Setups -> Traceability menu option.

- This should load the Traceability Setup Program.

- Click on the New Trace Code icon to load the Trace Code setup program.
Creating a new Trace Code
Once the Trace Code setup program is loaded, the user can start a new Trace Code by clicking on the New button at the bottom of the view.
![]()
This should clear anything that is currently loaded in the view.
The new Trace Code settings can now be entered.
These settings are,
[table width =”100%” style =”” responsive =”false”]
[table_head]
[th_column]Setting[/th_column]
[th_column]Description[/th_column]
[/table_head]
[table_body]
[table_row]
[row_column]Code[/row_column]
[row_column]This is a unique code for the traceability item to be set up e.g. DATE_USE_BY for a Use By Date[/row_column]
[/table_row]
[table_row]
[row_column]Description[/row_column]
[row_column]This is a short description of what the trace code is for e.g. Use By Date[/row_column]
[/table_row]
[table_row]
[row_column]Entry Type[/row_column]
[row_column]This is the data type of the trace code. There are currently 6 options : Date, Number, Text, List, Abattoir, Cutting Plant[/row_column]
[/table_row]
[table_row]
[row_column]List[/row_column]
[row_column]If ‘List’ is selected in the Entry Type field, the user can specify the predefined list for the trace code[/row_column]
[/table_row]
[table_row]
[row_column]Shelf Days[/row_column]
[row_column]For Date entry types, the user can select to add on shelf days set up in the system using this setting[/row_column]
[/table_row]
[table_row]
[row_column]+/- Days[/row_column]
[row_column]For Date entry types, the user can choose a specified number to days to add or subtract[/row_column]
[/table_row]
[table_row]
[row_column]Barcode Identifier[/row_column]
[row_column]This allows the user to set the GS1 identifier associated with this trace code. When a factory operator scans a GS1 label, this trace code will be filled in based on the data for this identifier. Certain GS1 identifiers have a modifier sequence at the end of the code e.g. 703 – Processor Approval. The modifier can be set in the modifier drop down beside the barcode identifier for these codes[/row_column]
[/table_row]
[/table_body]
[/table]
Once all the information has been entered, click on the Save button to save the new Trace Code
Entry Types
Each Trace Code has an Entry Type that determines the type of entry the operator in Factory or the user in Office will have to enter. These are,
[table width =”100%” style =”” responsive =”false”]
[table_head]
[th_column]Entry Type[/th_column]
[th_column]Description[/th_column]
[/table_head]
[table_body]
[table_row]
[row_column]Date[/row_column]
[row_column]The user will be prompted to enter a date with a date popup[/row_column]
[/table_row]
[table_row]
[row_column]Number[/row_column]
[row_column]The user will be prompted to enter a number with a numeric key pad popup[/row_column]
[/table_row]
[table_row]
[row_column]Text[/row_column]
[row_column]The user will be prompted to enter text with a keyboard popup[/row_column]
[/table_row]
[table_row]
[row_column]List[/row_column]
[row_column]The user will be prompted to select from a list of predefined options[/row_column]
[/table_row]
[table_row]
[row_column]Abattoir[/row_column]
[row_column]The user will be prompted to select from a list of predefined Abattoirs[/row_column]
[/table_row]
[table_row]
[row_column]Cutting Plant[/row_column]
[row_column]The user will be prompted to select from a list of predefined Cutting Plants[/row_column]
[/table_row]
[/table_body]
[/table]
Creating/Editing Traceability Lists
If the Trace Code has an Entry Type of List, a button will be shown to allow the user to create a new List if necessary.

Clicking on the List Setup button load the Trace List Setup program.
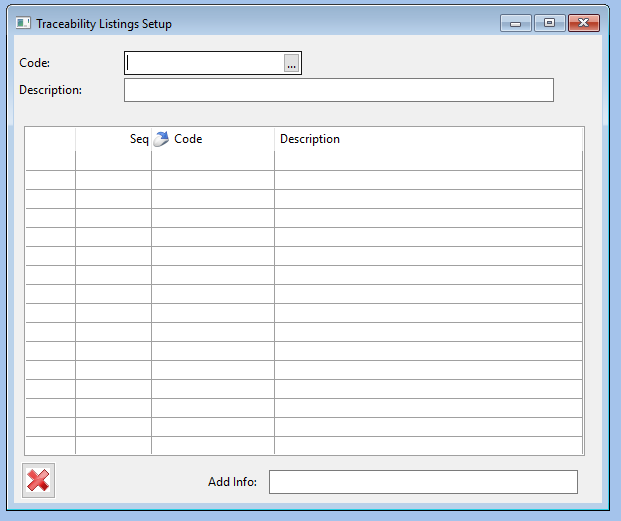
The user can create a new list by,
- First clear any loaded data by clicking in the Code field and pressing F5
- Enter in a unique list code. Current list codes are accessible by pressing the prompt button (…) or pressing F4 from the Code field
- Enter in a description for the list
- Click in to the grid and start entering the list values. The fields are,
- Seq – This sequence number determines the order items are shown to the user when entering traceability
- Code – a unique list item code
- Description – description of the list item
- Add. Info – additional information about this list item
- Tab across to finish the line to save the new list item.
- When entering data in the additional info form be sure to tab across the line in the grid to save the data
- When all list items have been entered, click on the close button to close the view.
The list can then be selected using the list code popup on the Trace Code Setup Screen
To edit an existing list,
- Load the Trace List Setup program as above
- Click the prompt button (…) in the Code field and select the List to be edited.

- Amend the list items in the grid as normal
Creating Abattoirs and Cutting Plants (Licence codes)
If the Entry Type is Abattoir or Cutting Plant, The Trace List Setup button will be shown to allow entry of new Abattoirs and Cutting Plants (the appropriate list will be loaded for the chosen entry type).
To set up a new Abattoir or Cutting Plant,
- Click the Trace List Setup button to load the licence code list setup program
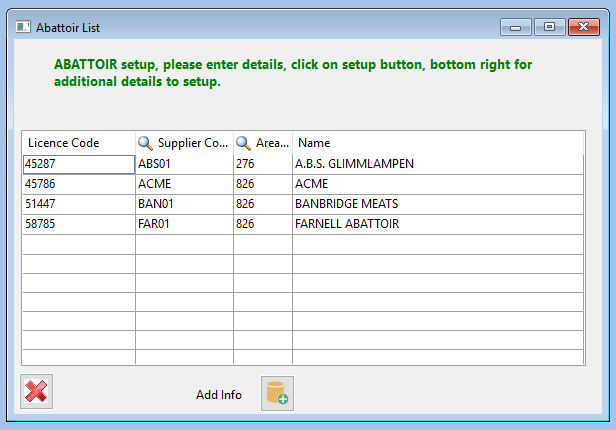
- You can then simply start to enter the new licence code data in to the grid. The grid columns are,
- Licence Code – The licence code
- Supplier Code – The Supplier to whom this licence code belongs (optional). This can be selected using the prompt button (…) to select from the supplier list.
- Area – The area for the licence code (generally these are the ISO area codes). This can be selected using the prompt button (…) to select from the area list.
- Name – The name of the license code
- When done entering all the information in the grid for the current licence code, tab across to finish the line and save.
Additional information for the licence code can be filled in by selecting the licence code on the list and clicking on the Add. Info button.
This will load the Licence Code Setup view.

To add additional information simply amend the appropriate fields and press the save button
A new Licence Code can be created from here by pressing the New button to clear the currently loaded Licence code.
When creating a new Licence Code in the Licence Code Setup view you will need to specify the licence type (abattoir/cutting plant) using the Type drop down.
Editing an existing Trace Code
To edit an existing Trace code,
- Load the List Code Setup program
- Press the Prompt button (…) in the Code field

- Select the Trace Code to edit from the popup list
- Amend the details are required
- Press the Save button to save the changes.