Connecting a Bluetooth Printer to the tablet for Season Online Road
The Bluetooth Printer is connected to the tablet using the standard Bluetooth setup in Windows.
We then point the Season Online Road software to the Bluetooth COM port belonging to that printer.
Removing An Existing connection
-
- Go to Start (Windows button) -> Settings (cog icon) -> Devices -> Printers and Scanners
- If the device is already listed, tap on the device name and select ‘Remove Device’

Adding the Bluetooth Printer device connection
- Go to Start (Windows button) -> Settings (cog icon) -> Devices -> Bluetooth & other devices
- Scroll up and tap on Add a printer or scanner
- Find printer by serial number and tap on it and then ‘Add device’

- If asked for a passcode, enter it and press ‘next’
- Some printers automatically generate a passcode. If this is the case, press the confirm button on the printer (usually a button with a tick on it), then ‘next’ on the tablet.
- The printer should now be connected to the tablet. It will probably say ‘Driver Unavailable‘ beside the printer in the Windows printer list. This is normal. There are no drivers that need to be installed as we print directly to the COM port in the printers native language.
Finding the Bluetooth port
We now need be able to tell Season Online road where to print to for this printer.
To do this we need to get the port the printer is on.
- Start (Windows button) -> Settings (cog icon) -> Devices -> Bluetooth.
- Select the device you have just added and in the ‘Related Settings’ section tap on ‘More Bluetooth options’.
- Tap on the ‘COM Ports’ tab.
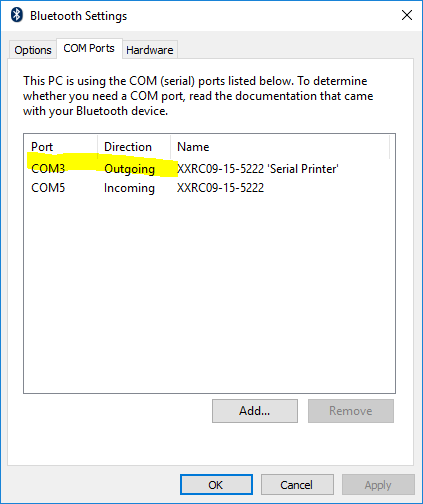
- Make a note of the Outgoing port. In this case COM3
- Tap on ‘Cancel’
Printer Setup in Season Online Road
Once the Bluetooth printer has been connected, Season Online Road needs to be configured to print to the printer.
- Log in to the Season Online Road software
- Go to Settings -> Printer Setup.
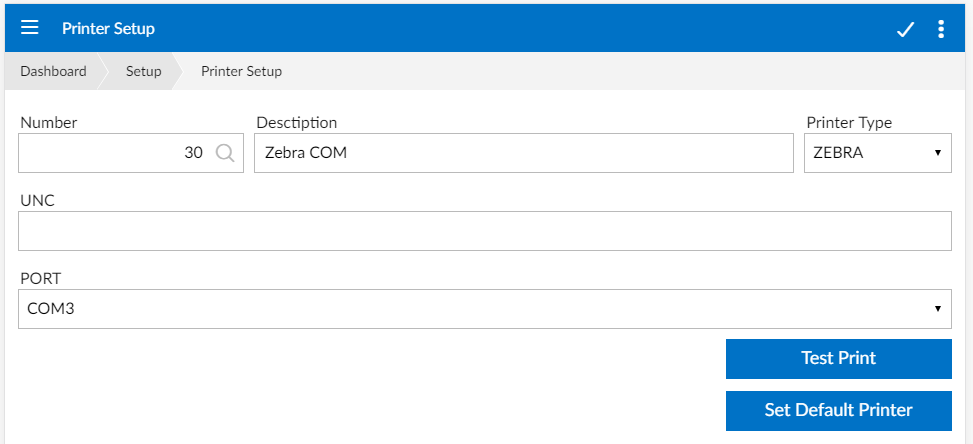
- Give the printer a unique number and a description.
- Select the printer type. (Typically this will be CPCL for Zebra printers)
- In the PORT field enter in the COM port from the Bluetooth setup. e.g COM3
- Tap on the Save tick at the top of the screen to save.
- You can then go back in to the printer setup, find the printer and do a ‘Test Print’ or ‘Set Default Printer’
You can edit an existing printer by clicking on the prompt icon in the ‘Number’ field and selecting an existing printer from the list.