Setting up Areas
Areas are used in Season when applying VAT rules to sales and purchases invoices. There are also many reports that can be run by Areas.
Before Areas are set up, you should ensure that the VAT codes have already been set up as these will come into play when setting up areas.
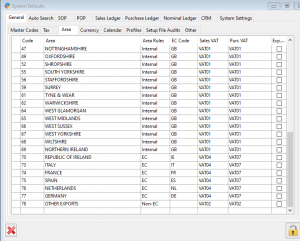
Area Setup View
- Launch the Season icon on the top menu, System Settings and Default codes
- Click on the General Tab then the Area Tab. You should see the Area Codes setup grid.
Setting up an Area
Once you have the Area Code Setup program loaded the process is the same.
- Click the unlock button at the bottom of the screen and enter your Supervisor password to allow you to make changes.
- Move to then end of the grid until you are on a new new line (CTRL+END or PAGE DOWN until you reach the end)
- Enter in the Area Code and Press TAB (The Area code can be be anything you want, but by default we generally use a 2 digit number)
- The area rules tab identifies where areas are in relation to your business location
- Internal- if you company is in England, and you set up an area for London, the area rule will be classes as ‘internal’.
- EC- an area within the European Union, eg, France
- Non-EC- an area outside the European Union, eg, USA.
- Enter in the EEC Code and press TAB. The is the designated EEC code for the area (e.g. IE is Ireland, GB is Great Britain etc…)
- Enter in a Description (again this can be anything you want).
- Select the Sales Vat code for the area by using the F4 popup. Press TAB
- Select the Purchases Vat Code for the area by using the F4 popup.
- Press Tab to complete the line and Save
Deleting an Area
You can delete the area by finding it in the list and pressing SHIFT+F2.
Press F5 to clear a partially entered area.
From Version 12.2 and up.
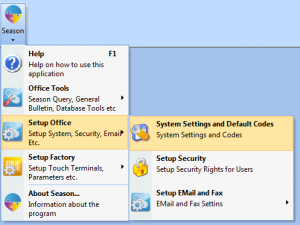
- Launch the System Settings and Default codes View. Season Icon -> Season Office -> System Settings and Default Codes.
2. Click on the General Tab then the Area Tab. You should see the Area Codes Setup grid
Version 12.1 and below.
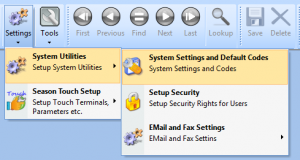
- Launch the System Settings and Default codes View. Settings-> System Utilities -> System Settings and Default Codes.
2. Click on the General Tab then the Area Tab. You should see the Area Codes setup grid.