How to Setup Product Messages
In Season you have the ability to setup product messages to appear on the Factory screen at different stages of processes in Season Factory. You can follow the below steps to see how these are setup.
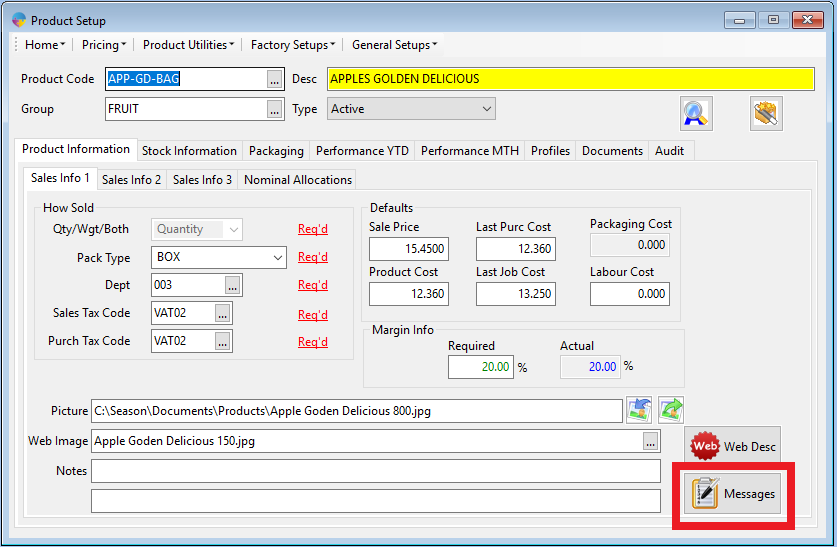
- From the Operations menu, go to Product Management -> Product Setup
- In Product Information -> Sales Info 1 tabs there is a ‘Messages’ button.
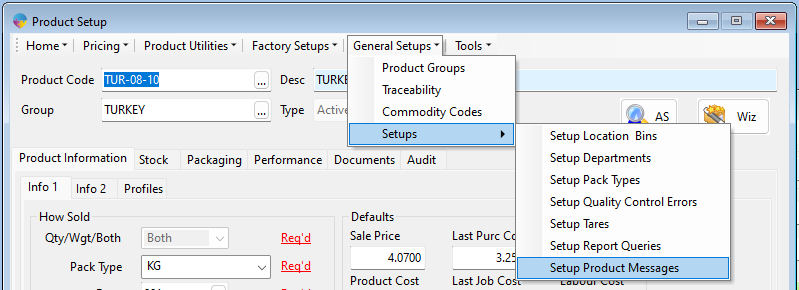
**In Season 23 there was a slight change to how the product message set up is accessed. You will find it under the general setups drop down menu. General Setups > Setups > Product Messages.
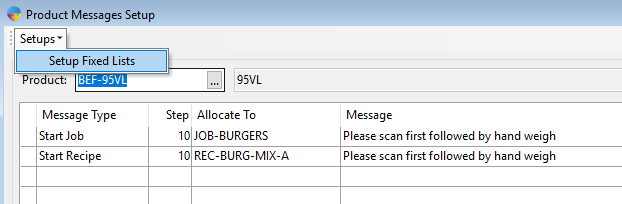
- This will take you to the ‘Product Messages Setup’ screen

You can setup individual messages against each product, or you can setup default messages to appear against ‘All’ products.
How to Setup Default messages for ‘All’ products
- Set up a product record with the Product Code ‘ALL’. Click Here for more details on setting up a product.
- Tick the ‘All Products‘ box within Product Messages Setup

When you have selected the product, you will be able to choose the:
- Message Type – choose where in the process you want this message to appear.
- Start Sales Order – will appear when you open a sales order via Factory Goods Out
- Start Receipt – will appear when you open a purchase order via Factory Goods In
- Start Handweigh – will appear when you open the handweigh option within a recipe via Factory Jobs
- Start Job – will appear when you open a job via Factory Jobs
- Start Recipe – will appear when you open a recipe via Factory Jobs
- End …….. – You also have “end” options for all of the above, end job, end recipe etc. These messages will appear in the same area as the start options but they will appear when you click save on your job, recipe etc.
- Step – the order you want the messages to appear.
- Allocation – choose a job to allocate this product message to
- Message – enter the message to appear
- Response – choose how the operator should answer the questions
- Yes/No – operator to respond with ‘Yes’ or ‘No’
- Info Only – message will be displayed to operator, with no response required
- Fixed List – operator can choose answer from a list of options
- Free Text – operator to enter text – if this option is selected, you can choose whether it is mandatory for the operator to enter a response.

If you choose for the message response to be ‘Yes/No’ you will have the option to enter additional messages based on how the operator responds. As well as this, you are able to choose to skip to another step, or stop the message entry, depending on the answers provided.
Setting up messages for ‘INDIVIDUAL’ products.
- Follow the steps above for setting up “ALL” but instead of checking “All Products” click into the Product field and press F4 to load your product list. Select your product and click the green tick. See details above about what each column is for.
How to setup Fixed List Answers
- Within Product Messages go to Setups -> Setup Fixed Lists
- This will bring up the ‘Answers Setup’ window
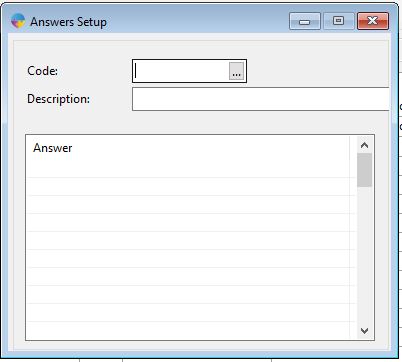
- Enter a Code, and Description for the Fixed List, and save by pressing F2
- In the bottom grid, enter in the answers you want the operators to choose from, just tab onto a new line each time to save the answer.
Mapping Dispatch Message to Products
Season 24 added the ability to set up a “Messages Only” product code. This code will not show as an active code along with “active” products. The purpose of this code is to hold the message set up you want to use for mapping to other “active” products. This will allow you to set up a single set of messages that can be applied to several other active product codes that you want to have the same messages for.
Setting up a Messages Only Product Code
See Product Setup for how to set up a product. When setting up this product, make sure to change the product type to “Messages Only” or you will not see the account when you come to map.
Adding Messages to the product code
When you have the product code set up as a “messages only” account, add your messages in, you can use the info in the above section, “How to Setup Default messages for ‘All’ products” to help with what you need to add to each column.
Mapping the messages to active product codes
Now you have set up the messages account and added the messages you want to display, you need to map that product code to your other “active” product codes that you want these messages to appear on.
Open the product set up window, found under the Product Management tab on your right hand operations menu.
On the product set up window, you need to select the Product Information tab followed by the Info 2 tab. Now in the bottom middle of the product setup window you should see a section “Map Message from”.
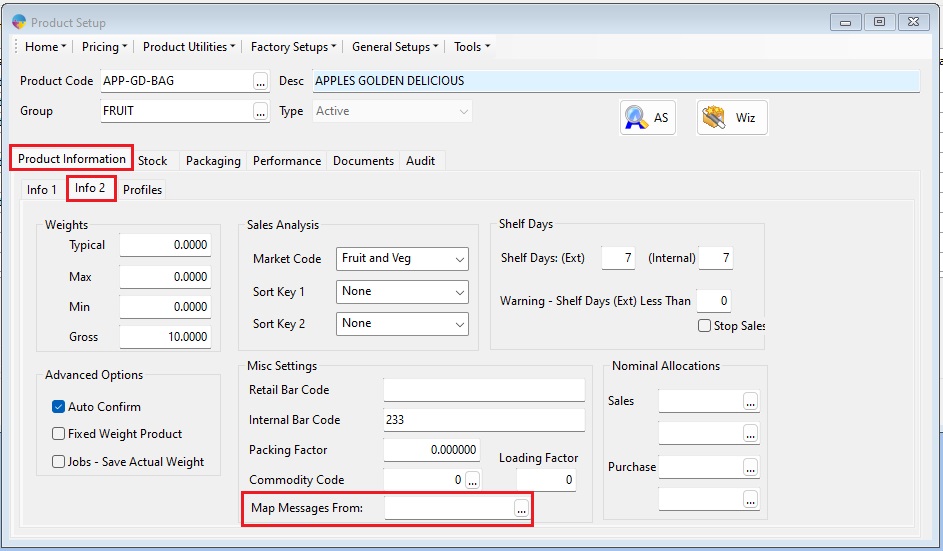
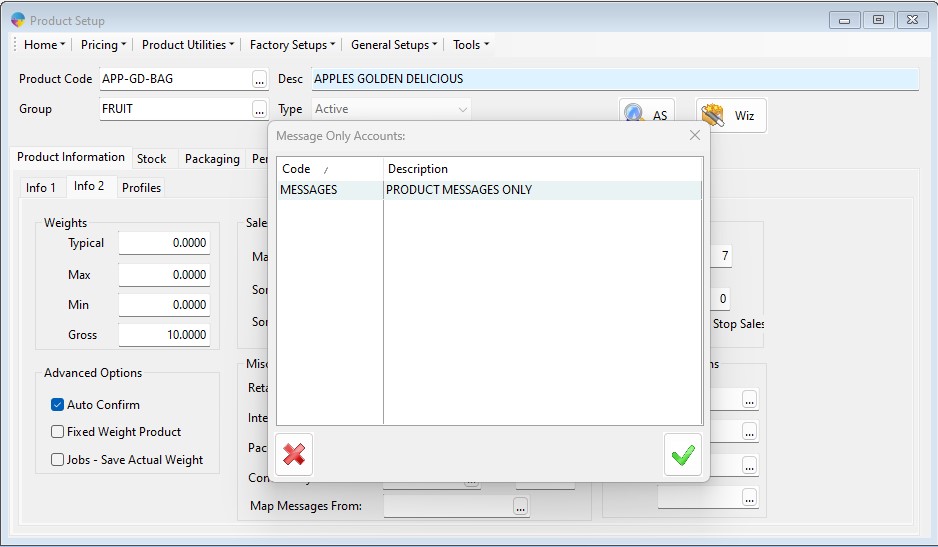
Click into the field and press your F4 key. This will open a new window that will list all “Messages Only” products. You need to select the product code you wish to use for the product mapping. Once that is done you can click the save button found along the top of your screen or use the keyboard shortcut “F2”.
**Please Note. Season will check for messages in the order of; product specific messages, then mapped messages and finally “ALL” messages. This means, when determining if messages should be shown for a product, Season will first check if you have set up product specific messages first, if you have, those will be used. If Season finds no product specific messages set up, it will move on to check for any messages mapped, if you have no product specific messages but have set a mapping up, the mapped messages will be used. If you have no product specific messages and not mapped any messages then Season will go on to check if you have messages set up for “ALL” products. If you have an “ALL” set up in place, the “ALL” messages will be used.