How to: Season Online Setup in Season Office
Setting up a customer as a web customer
To set up a customer as a web customer to allow them access to Season Online,
- Bring the customer up in customer setup
- Go to the Settings -> Account Settings -> Other tab page

- Check the ‘Authorised to use Web Ordering’ check box
- Save by pressing F2 or by clicking the save button at the top of the screen
Other customer settings
The other customer settings for web ordering are,
- Approve Web Order – this setting determines whether, once an order is placed in the web ordering system, the order needs to be approved by staff before it flows into the normal sales order processing system.
- Send Order acknowledgement – This setting determines whether, once an order is approved, it will appear in the Sales Order Acknowledgement section for an email acknowledgement of the order to be sent to the customer.
The options for both these settings are,
- Global – respect the global system setting
- Yes – set the setting as active for this customer
- No – set the setting as inactive for this customer
Setting up a contact to receive order acknowledgements
In order to send order acknowledgements to a customer, one of the contacts need to be set up to receive those order acknowledgements.
To set a contact to receive order acknowledgements,
- Check the ‘Ord.’ column against the contact in the contacts setup grid in Customer Setup
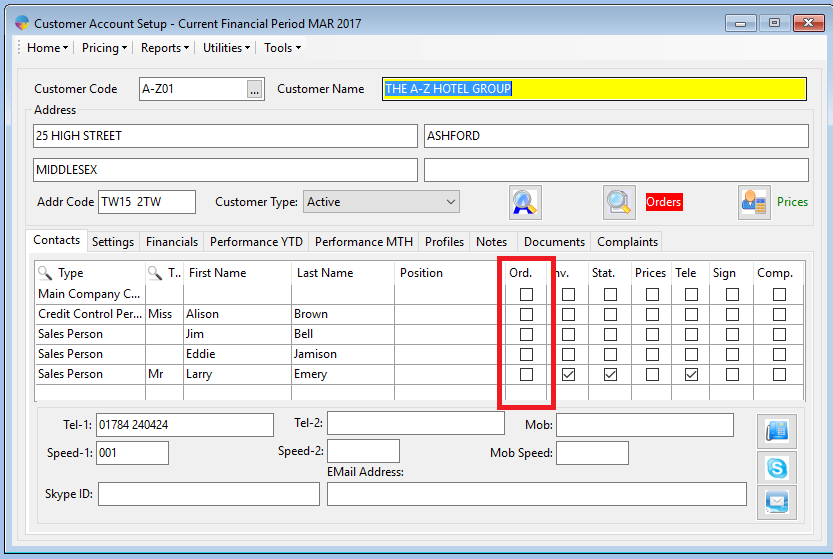
- Tab across to finish the line and save the changes
Global Settings
To simplify the setup, some of the customer settings have global options so they don’t need to be set for every customer.
To set the global settings,
- Open the System Default view. (Season button -> Setup Office -> System Settings and Default Codes)
- Click on the SOP tab
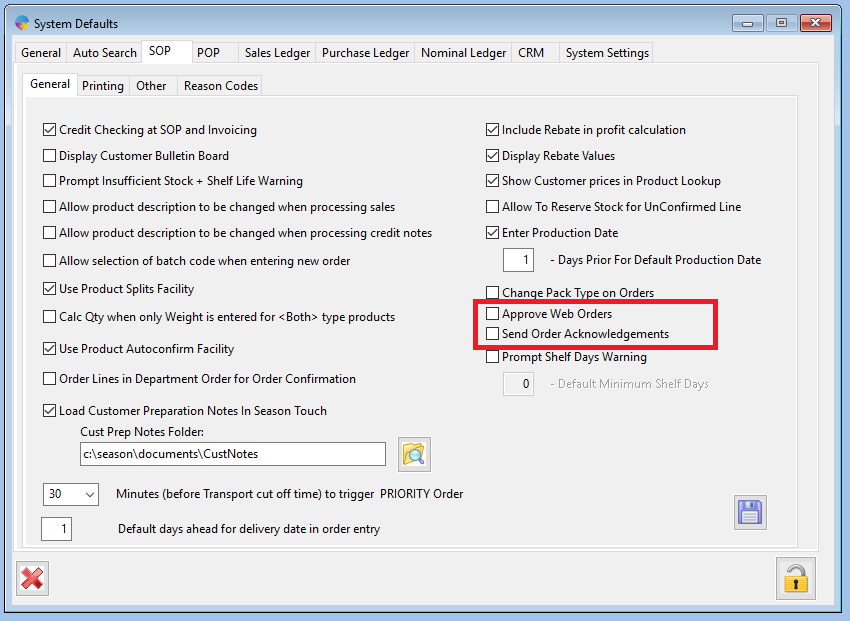
- Click on the Unlock button and enter in your password to unlock the view.
- The settings pertinent to Season Online are,
- Approve Web Orders
- Send Order Acknowledgements
- Set these settings as appropriate and click on the Save button.
Setting up Web User Groups
Each Web Customers belongs to a group that determines what level of access they have to features of Season Online.
To set up a Web User Groups,
- Load the Web App User setup program.
- In 16.1 and 16.2, Season button -> User Account Options -> Web App User Account Settings
- In 17.1, Season button -> Season Office -> Web App User Account Settings
- Click on the Utilities menu -> User Group Setup

- Enter in the new group code and description and appropriate settings
- Sales Order Processing Rights – determines the rights to place orders etc. ‘Operational’ rights are required to place an order
- Customer Price Management Rights – determines the rights to view prices etc. ‘Rights –Orders’ are required to view prices when placing an order
- Sales Ledger Rights – determines the rights to view statement etc. ‘Rights – Ledger’ are required to view the statement.
- Click on the Save button to save.
- You can amend the user rights by selecting the rights group using the Group Code popup and amending the settings as necessary.
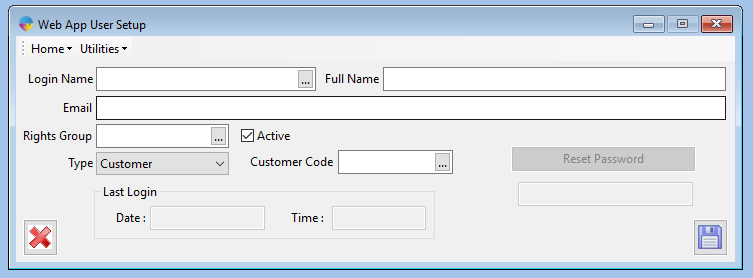
Setting up a Web User for the web customer
Once a customer has been set up with authorisation to place web orders, they will need a username and password to access Season Online. A customer can have multiple logins.
To set a customer up with a username and password, you have two methods of doing this:-
Via Customer setup
- On the operations menu, go to Sales Invoicing> Customer setup
- Load up your customer and navigate to the contacts tab, as below
- Select the contact that you want to create a web user account for.
- Click the ‘Create Web User’ button
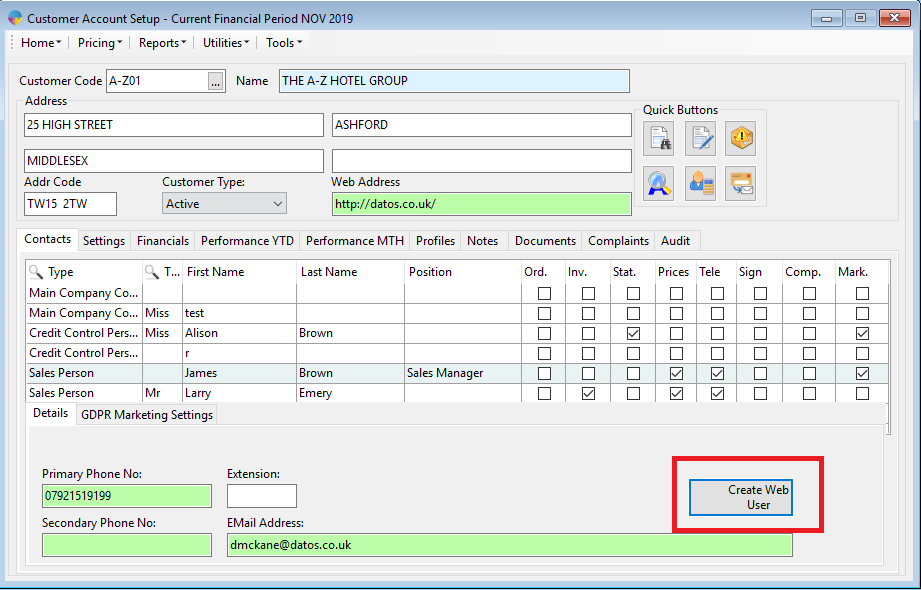
- You will now see the ‘Web app User Setup’ form appear. Most of the required information will be already defaulted for you.
- Choose a rights group and then click the save icon.
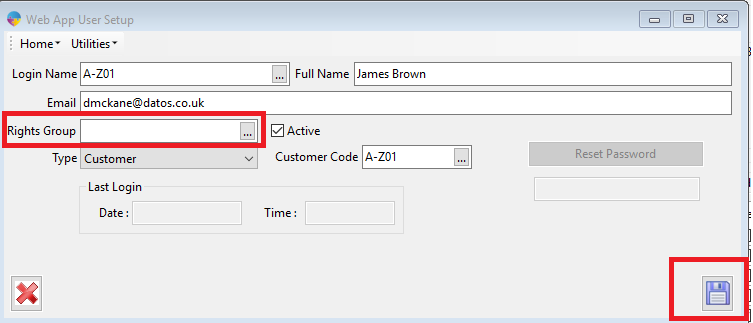
Via Web app user Setup
- Load the Web App User setup program.
- In 16.1 and 16.2, Season button -> User Account Options -> Web App User Account Settings
- In 17.1, Season button -> Season Office -> Web App User Account Settings
- Enter in a unique Login Name. This will be the username the customer uses to log in to Season Online.
- Enter the Full Name and Email address for this user.
- The full name will be displayed to the user throughout Season Online
- The email address will be used to allow the user to reset their password should they forget.
- Select the rights group for this user.
- Select the user type. The user type determines the interface the user s presented with when they log in to Season Online. The user types are,
- Customer – This type is for a customer who you want to place orders through Season Online. They can only place orders for the customer associated with their login and see a more customer friendly version of the Season Online interface.
- Mobile – This user type is for a user out on the road who would be taking order e.g. a van delivery driver.
- Rep – This user is for a rep who would be out on the road taking orders and managing customers accounts / prices. Similar to the ‘Mobile’ type but with a slightly different layout more suited to the reps needs
- If you select Customer, you will need to select the customer to whom this web user belongs
- Click the Save button.
- This will generate a password for the user. This should be send to the user along with their username. They can change the password once they log in.
- If the password need to be reset for whatever reason, you can click on the ‘Reset Password’ button to generate a new password.
Checking the number of web customers allowed
The Season License limits the number of concurrent web customers registered for Season Online.
To check the number of allowed Season Online customers,
- Click on the Season button -> About Season…

- Click on the Registration Code button
- This should load the registration information dialog.

- Here you will be able to see the number of Web Customers you can register.