Changes to VAT Code Setups
With the release of Season 19.2, how VAT codes are set up has changed. If you are using Season version 19.1 or earlier then use this guide.
Setting up a VAT Code
First you need to open your system settings. Click the Season icon, found on the main menu bar along the top of your screen. Select Setup Office then System Settings and Default Codes.

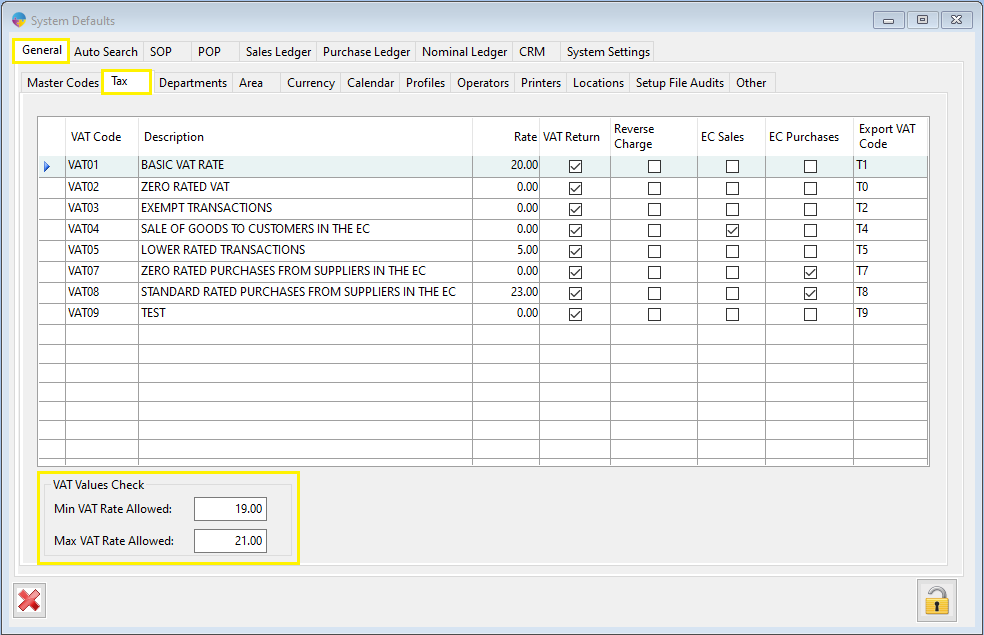
When your System Defaults window opens, Click on the General tab then the Tax tab.
Adding a new VAT Code.
- On the first available blank line, enter a VAT code into the first column. The same code can’t be used more than once.
- Give your VAT code a description.
- Check boxes
- VAT Return – check if this VAT code needs to be included in any VAT returns you will complete
- Reverse Charge – check this if you think that you may be liable for reverse charges on purchases from outside the UK.
- EC Sales – check this if the VAT code will be used for Sales to European Countries
- EC Purchases – check this if the VAT code will be used for Purchases from European Countries
- If you are exporting your ledgers out of Season into a 3rd party software program, enter the corresponding VAT code in the Export VAT code column
Settings VAT Check Ranges
When you have a VAT code selected in the grid, you will see Min/Max allowed Rate in the bottom left corner of the window. This is used to allow for small differences in calculations of VAT, sometimes when rounding is used in Season your VAT figure may not come out exactly at the percentage Season expects. Setting these boxes to allow .5/1% of leeway either side of the exact percentage figure will eliminate any VAT errors caused by a figure being off ever so slightly.